
 A Sunday lunch show-stopper, this raspberry and vanilla cake will make for the perfect addition to your Easter Sunday lunch.
Bake a 6” Raspberry and Vanilla Cake in 2 x 6” tins
What You’ll Need:
- 240g unsalted butter
- 270g caster sugar
- 240g self raising sponge flour
- 60g good quality cocoa powder
- 4 happy eggs
- 2 tablespoons milk
- 100 grams fresh raspberries
Raspberry Swiss Meringue Buttercream
- 225 g unsalted cold butter cut into cubes
- 160g sugar
- 100g happy egg white
- pinch of salt
- 200 g raspberries
What To Do:
- Beat the butter and sugar together until it’s very light and fluffy. (About 5 minutes in a stand mixer)
- Sift the flour.
- Add the happy eggs, one at a time, with a spoonful of the flour, beating well between adding each egg.
- Add the milk and stir gently.
- Add the remaining flour, and gently fold in.
- Fold in the raspberries.
- Place into 2 x 6” greased and lined cake tins and bake in a preheated oven (130C conventional oven or 140 C fan oven) for around 60 minutes, or until a knife comes out clean.
- Leave cakes to cool.
Raspberry Swiss Meringue Buttercream
- Gently heat the raspberries in a saucepan until they are reduced and form a puree.
- Leave to cool.
- Place the happy egg whites and sugar in a bowl over a pan of simmering water.
- Stir constantly until the sugar has dissolved completely and the egg whites are hot (160F).
- Whip this mixture with the whisk attachment of a mixer until the meringue is thick and glossy and the bowl is cool.
- Add the salt and cubes of butter one at a time until each is incorporated. If the mixture curdles, keep mixing and it will come back together.
- Add the raspberry puree. And mix in well.
Assemble, cover and decorate the cake.
- Level the top of each cake with a sharp knife.
- Cut each in half so you have 4 layers.
- Spread some buttercream on a 6” cake board then place the first layer of cake on this.
Spread a thin layer of buttercream, then the next layer of cake. - Continue until you have 4 layers of cake and 3 layers of buttercream.
- Trim the sides of the cake so you they are straight with no bulges.
- Spread a thin layer of buttercream all over the cake.
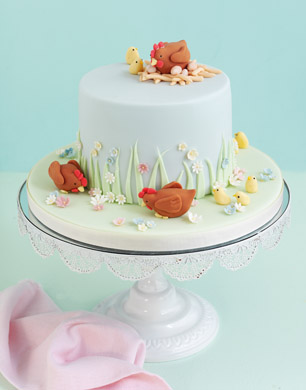
- Cover with pale blue sugarpaste.
- Cover a 10” cake drum with pale green sugarpaste.
- Roll out some green sugarpaste quite and cut out the grass shapes. Attach these around the base of the cake using edible sugar glue. Leave to dry for a few hours.
- Spread some royal icing on the green covered cake drum, then place the blue cake on top.
Model decorations using Modelling paste
- Knead 1 teaspoon of Tylo powder into 100g of sugarpaste to make the modelling paste.
- Colour the modelling paste using paste or gel colours in brown, red, yellow, pink, blue, beige white.
- Make a nest using small rolled pieces of the beige paste.
- Make the hens body and wings out of brown modelling paste. To make the beak, take a tiny bit of yellow sugarpaste, roll in your fingers to make a smooth ball, then form into cone shape and cut off the smaller end, attach to the head with edible sugar glue.
- Make the Hen Comb and wattle. Take a tiny size bit of sugarpaste, roll in your fingers to make a smooth ball, flatten slightly, then form into a teardrop shape and cut off the smaller end.
- Make 3 of these for each hen, and 2 smaller ones for the wattle.
- Attach to the head with edible sugar glue.
- Draw in the eyes using a black edible pen.
- Make the chicks using yellow modelling paste. Make the beaks as above and draw in the eyes using a black edible pen.
- Cut out tiny flowers using flower cutters and pipe a tiny dot of royal icing in the centres.
- Attach all the decorations onto the cake using either edible sugar glue or royal icing.
Visit www.thehappyegg.co.uk